Common Signs Your Roof Flashing is Failing Around Your St. Anthony Park Chimney
Living in St. Anthony Park means your home faces the same harsh Minneapolis winters that test every roofing component. The flashing around your chimney works as a critical barrier against water infiltration but often shows failure before you notice a problem inside your home. This guide walks you through the specific signs of failing chimney flashing so you can catch issues early and protect your home from costly water damage. Storm Damage Roof Inspections in Plymouth – What to Look for After a Major Storm.
Why Chimney Flashing Fails in Minneapolis
Minneapolis weather creates unique challenges for roof flashing. The freeze-thaw cycles common in St. Anthony Park cause metal flashing to expand and contract repeatedly. Over time this movement breaks down sealants and creates gaps where water can enter. Ice dams that form along roof edges force melting water under shingles and against flashing seams. The combination of heavy snow loads and temperature swings accelerates flashing deterioration compared to milder climates.
Many St. Anthony Park homes were built between 1920 and 1960 with brick chimneys that require step flashing integrated into the mortar joints. These older installations often used galvanized steel that rusts when exposed to moisture and road salt carried by winter winds. Modern copper or aluminum flashing resists corrosion better but still fails when installation quality suffers or when sealants dry out after years of UV exposure.
Visible Signs of Flashing Leaks From the Ground
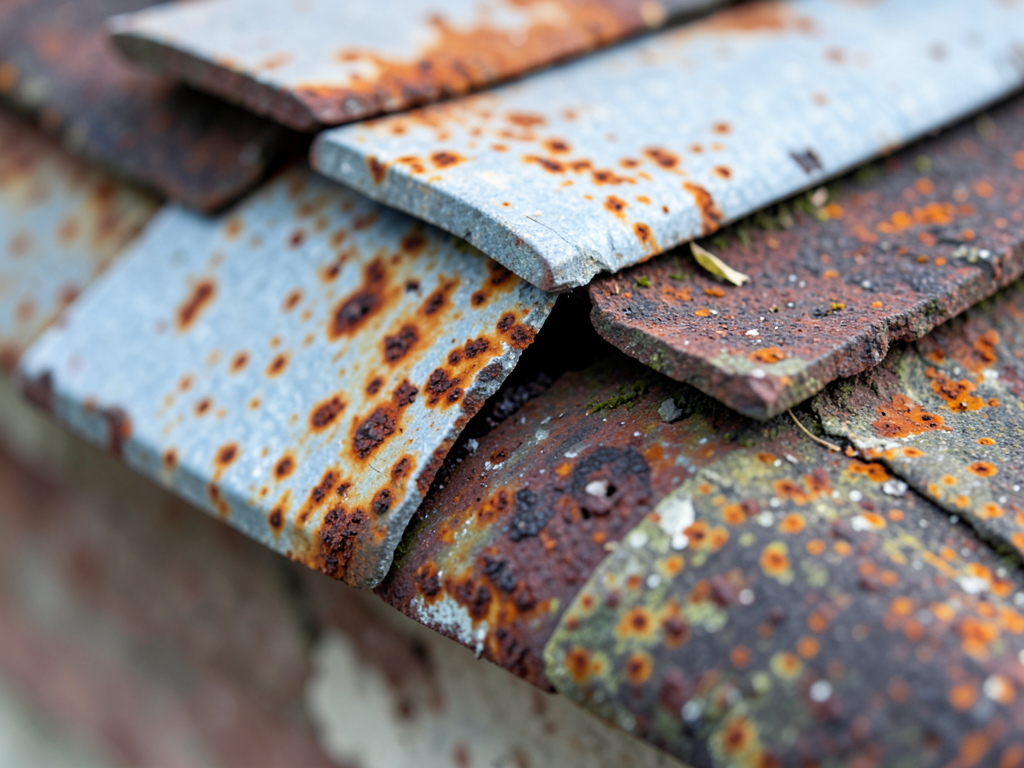
You can spot many flashing problems without climbing on your roof. Look for rust stains running down the chimney face or brick walls near the roofline. These orange or brown streaks indicate metal deterioration that allows water to seep through. Check for separated or lifted flashing pieces where the metal pulls away from the chimney or roof surface. EPA Mold Information.
Cracked or missing sealant along flashing edges creates visible gaps. In St. Anthony Park’s older neighborhoods, you might notice crumbling mortar around step flashing that once held metal pieces firmly in place. Missing counter flashing that should cover the top edge of step flashing exposes vulnerable joints to direct water contact.
Pay attention to any visible sagging or deformation in the flashing itself. Metal that appears bent, twisted, or no longer lies flat against surfaces has likely lost its seal. Even small gaps of a quarter inch can allow significant water infiltration during heavy rain or snowmelt.
Interior Warning Signs That Point to Flashing Problems
Water stains on ceilings near chimneys often indicate flashing failure rather than roof shingle problems. These stains typically appear as discolored rings or irregular patches that grow larger after wet weather. In St. Anthony Park homes, you might notice these stains in second-story rooms directly below chimney stacks.
Musty odors around fireplaces or in rooms adjacent to chimneys suggest moisture accumulation from leaks. This moisture creates conditions for mold growth within wall cavities or attic spaces. Check for peeling paint or wallpaper near chimney walls, which occurs when water penetrates and causes surfaces to separate from their backing materials.
Damp or cold spots on interior walls around chimneys indicate active water infiltration. Touch the wall surface during or after precipitation to check for temperature differences that suggest moisture presence. In severe cases, you might notice water dripping or pooling inside near the chimney base during heavy rain or rapid snowmelt.
Common Flashing Failure Locations Around Chimneys
The most vulnerable area is where step flashing meets counter flashing along the chimney sides. This intersection experiences the most movement from thermal expansion and often loses sealant integrity first. The chimney-siding junction also fails frequently in St. Anthony Park homes where wood siding meets masonry.
Roof penetrations around chimneys create additional failure points. Vent pipes, satellite dish mounts, or other rooftop equipment installed near chimneys can compromise existing flashing. The area where the chimney cricket or saddle meets the main roof often develops leaks as ice and debris accumulate in this valley-like depression.
Corner joints on chimneys represent high-stress areas where flashing pieces meet at angles. These corners experience concentrated water flow during storms and often show the first signs of sealant failure. The base of the chimney where flashing meets the roof deck also deteriorates as water pools and seeps under metal edges.
Ice Dams and Their Impact on Chimney Flashing
Ice dams form when heat escaping through your roof melts snow, which then refreezes at colder roof edges. In St. Anthony Park, these ice formations can grow several feet thick and create enormous pressure against flashing. As ice dams expand, they lift shingles and flashing, creating pathways for water to enter your home.
The freeze-thaw cycle within ice dams causes water to expand when it freezes, forcing its way through even tiny flashing gaps. This hydraulic pressure can split metal flashing and destroy sealants. Poor attic ventilation in older St. Anthony Park homes contributes to ice dam formation by allowing warm air to accumulate under the roof deck.
Ice dam damage often appears worse on north-facing chimneys that receive less direct sunlight. These shaded areas stay frozen longer, creating extended periods of water backup against flashing. The weight of heavy ice accumulations can also physically bend or displace flashing pieces, particularly on older installations with corroded fasteners.
DIY Inspection vs. Professional Assessment
You can perform basic visual inspections from ground level using binoculars to check for obvious flashing damage. Look for missing pieces, severe rust, or separated joints. Inside your home, inspect attic spaces near chimneys for water stains, mold growth, or daylight visible through roof penetrations.
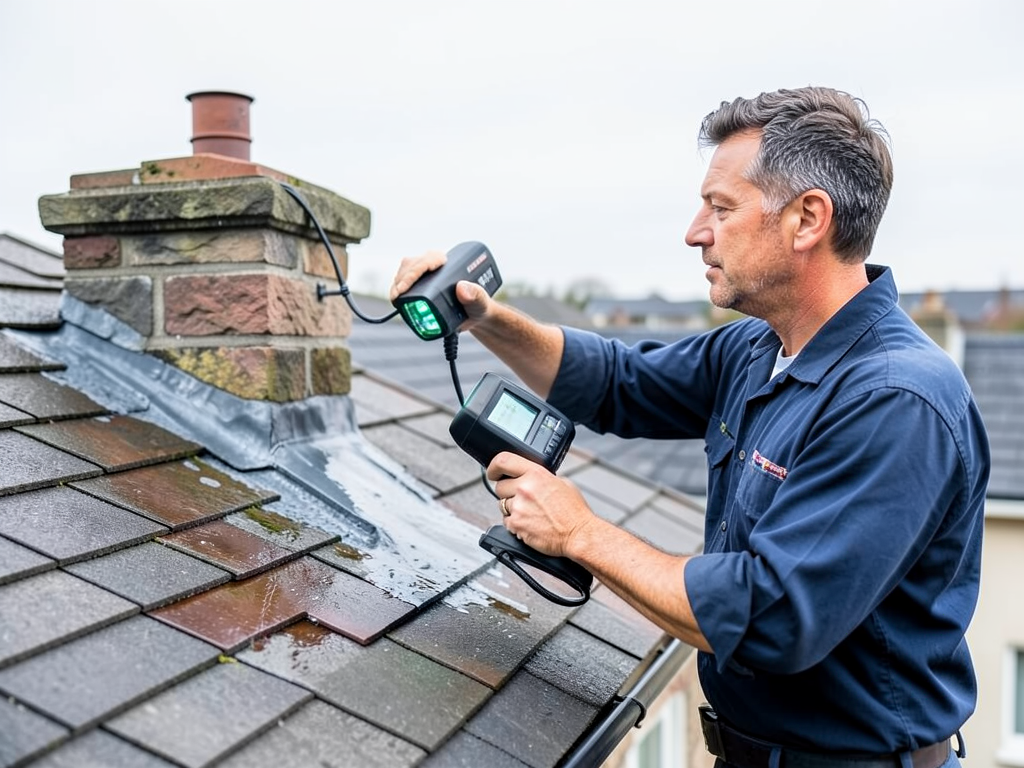
However, many flashing problems require professional assessment to identify. Trained inspectors use moisture meters to detect hidden water infiltration and infrared cameras to find temperature variations indicating moisture presence. They can also check flashing integrity from roof level, where most problems originate but remain invisible from the ground.
Professional inspections become essential when you notice interior water damage but cannot identify the source. Water can travel along rafters or through wall cavities before appearing as stains far from the actual leak point. A thorough inspection includes checking attic ventilation, roof deck condition, and related components that contribute to flashing failure.
Repair Options and Material Choices
Minor flashing repairs involve removing damaged sealant, cleaning surfaces, and applying new waterproof caulk or roofing cement. This approach works for small gaps or deteriorated sealant but does not address structural metal damage. For rusted or physically damaged flashing, complete replacement provides the most reliable solution. How Much Does a Full Roof Replacement Cost in Bloomington?.
Material selection impacts longevity and performance. Galvanized steel offers the lowest initial cost but typically lasts only 15-20 years in Minneapolis conditions. Aluminum resists corrosion better and handles thermal movement more effectively. Copper provides superior durability with lifespans exceeding 50 years but costs significantly more upfront.
Modern synthetic sealants outperform traditional roofing cement in flexibility and weather resistance. These advanced materials maintain their seal through greater temperature swings and resist UV degradation longer. Professional installers often combine mechanical fastening with high-quality sealants for maximum waterproofing. Trusted Roofing Contractors in St. Louis Park for Shingle Replacement.
Prevention Strategies for Minneapolis Homeowners
Proper attic insulation and ventilation reduce ice dam formation that damages flashing. Aim for consistent attic temperatures close to outdoor conditions by sealing air leaks from living spaces below. This prevents snow melt that creates ice dams along roof edges and around chimneys.
Regular gutter cleaning prevents ice buildup that can back up under roof edges and against flashing. In St. Anthony Park’s mature tree canopy, remove leaves and debris at least twice yearly, with additional cleaning after major storms. Consider installing heat cables in problem areas to prevent ice dam formation.
Annual visual inspections catch minor issues before they become major repairs. Check flashing after severe weather events and at season changes. Look for new gaps, rust development, or sealant deterioration that occurred during winter months when damage often goes unnoticed. Expert Flat Roof Repair Services for Uptown Businesses and Modern Lofts.
When to Call a Professional Immediately
Active water infiltration requires immediate professional attention to prevent structural damage. If you notice dripping water, active ceiling stains growing during precipitation, or visible daylight through roof areas near chimneys, do not delay repairs. Water damage accelerates quickly once it finds pathways through compromised flashing.
Multiple warning signs indicate systemic problems requiring comprehensive assessment. When you observe interior stains, exterior flashing damage, and signs of moisture in attic spaces simultaneously, the flashing system likely needs complete replacement rather than spot repairs.
Storm damage from hail or high winds can compromise flashing integrity even when damage appears minor. Minneapolis experiences frequent severe weather that can bend flashing, dislodge fasteners, or create microscopic cracks in sealants. Professional inspection after major storms helps identify damage that could lead to leaks later.
Cost Considerations for Flashing Repairs
Flashing repair costs vary significantly based on damage extent and material choices. Simple sealant replacement might cost a few hundred dollars, while complete flashing system replacement for a large chimney could exceed several thousand dollars. The key factor is addressing problems early when repairs remain relatively minor.
Compare repair costs against potential water damage expenses. A $500 flashing repair prevents the thousands of dollars in damage from ceiling replacement, insulation removal, mold remediation, and structural repairs that result from prolonged leaks. Insurance often covers sudden damage but may deny claims for neglected maintenance issues. Commercial Roof Maintenance.
Material selection affects both upfront costs and long-term value. While copper flashing costs more initially, its 50+ year lifespan often provides better lifetime value than replacing galvanized steel every 15-20 years. Factor in your home’s expected ownership duration when making material choices.
Local Building Code Requirements
Minneapolis building codes require specific flashing installation standards for chimney penetrations. These codes mandate minimum metal gauge thickness, corrosion-resistant materials in certain applications, and proper integration with underlayment systems. Permits are required for flashing replacement when it involves removing roofing materials.
Local codes also address ice and water shield requirements in Minnesota’s climate. This waterproof membrane must extend up roof slopes from eaves and around penetrations like chimneys. Proper installation prevents water infiltration even when ice dams form or flashing fails temporarily.
Historic district regulations in parts of St. Anthony Park may restrict flashing material choices to maintain architectural authenticity. Copper and lead-coated copper often meet both performance requirements and historic preservation guidelines. Check with local authorities before replacing flashing on designated historic properties.
Frequently Asked Questions
How long should chimney flashing last in Minneapolis?
Quality chimney flashing typically lasts 20-30 years in Minneapolis conditions. Galvanized steel may fail after 15-20 years while copper or high-grade aluminum can exceed 40 years with proper installation. Harsh winters and ice dams significantly reduce flashing lifespan compared to milder climates.
Can I repair chimney flashing myself?
Minor sealant repairs are possible for homeowners comfortable with basic tools and ladder safety. However, proper flashing installation requires roofing experience to ensure waterproof seals and code compliance. DIY repairs often fail prematurely when underlying installation issues remain unaddressed.
What causes chimney flashing to leak?
Common causes include thermal expansion and contraction breaking sealant bonds, ice dams forcing water under flashing, rusted metal deterioration, improper original installation, and physical damage from storms or falling debris. Most leaks result from multiple failure factors rather than single causes.
How much does chimney flashing repair cost?
Repair costs range from $300 for simple sealant replacement to $2,000-$5,000 for complete flashing system replacement on a standard chimney. Factors affecting cost include chimney size, roof pitch, accessibility, material choices, and whether underlying roof repairs are needed.
Should I replace my roof when replacing flashing?
Flashing replacement often requires removing surrounding shingles, making it efficient to replace roofing materials during the same project if they are near end-of-life. If your shingles are less than 10 years old and in good condition, flashing replacement alone is usually sufficient.
- Ground Level Visual Check
Stand back from your home and use binoculars to examine flashing around the chimney. Look for rust stains, separated joints, missing sealant, or visible gaps between flashing and chimney or roof surfaces.
- Interior Inspection
Check ceilings and walls near the chimney for water stains, discoloration, or peeling paint. In the attic, look for moisture, mold, or daylight visible through roof areas around the chimney.
- Seasonal Assessment
Inspect flashing after winter ends and again after severe storms. Minneapolis weather creates year-round challenges, so seasonal checks help catch damage before leaks develop.
- Professional Evaluation
Schedule professional inspection if you notice any warning signs or cannot safely access roof areas. Professionals use moisture meters and infrared cameras to detect problems invisible to the naked eye.
Protect your St. Anthony Park home from water damage by addressing chimney flashing problems early. The combination of Minneapolis weather and older home construction makes regular flashing inspection essential for preventing costly interior damage. When you spot warning signs, professional assessment ensures proper diagnosis and lasting repairs.
Call Keystone Roofing Minneapolis today at (651) 588-9277 for expert chimney flashing inspection and repair. Our team understands Minneapolis-specific challenges and provides lasting solutions that protect your home through every season. For more information, visit FEMA Ice Dam Protection Guide.
{
“@context”: “https://schema.org”,
“@type”: “BlogPosting”,
“headline”: “Common Signs Your Roof Flashing is Failing Around Your St. Anthony Park Chimney”,
“description”: “Learn to spot failing roof flashing around chimneys in St. Anthony Park. Our guide covers Minneapolis-specific signs, causes, and repair options for homeowners.”,
“wordCount”: 2202,
“datePublished”: “2026-04-12T07:13:00.000Z”,
“dateModified”: “2026-04-12T07:13:00.000Z”,
“inLanguage”: “en-US”,
“mainEntityOfPage”: {
“@type”: “WebPage”,
“@id”: “https://keystoneroofingminneapolis.com”
},
“publisher”: {
“@type”: “LocalBusiness”,
“name”: “Keystone Roofing Minneapolis”,
“url”: “https://keystoneroofingminneapolis.com”
},
“author”: {
“@type”: “Organization”,
“name”: “Keystone Roofing Minneapolis”,
“url”: “https://keystoneroofingminneapolis.com”
},
“image”: {
“@type”: “ImageObject”,
“url”: “https://keystoneroofingminneapolis.com/wp-content/uploads/2026/03/common-signs-your-roof-flashing-is-failing-around-1.png”
}
}
{
“@context”: “https://schema.org”,
“@type”: “RoofingContractor”,
“name”: “Keystone Roofing Minneapolis”,
“url”: “https://keystoneroofingminneapolis.com”,
“address”: {
“@type”: “PostalAddress”,
“addressLocality”: “Minneapolis”
},
“areaServed”: {
“@type”: “City”,
“name”: “Minneapolis”
}
}
{
“@context”: “https://schema.org”,
“@type”: “FAQPage”,
“mainEntity”: [
{
“@type”: “Question”,
“name”: “How long should chimney flashing last in Minneapolis?”,
“acceptedAnswer”: {
“@type”: “Answer”,
“text”: “Quality chimney flashing typically lasts 20-30 years in Minneapolis conditions. Galvanized steel may fail after 15-20 years while copper or high-grade aluminum can exceed 40 years with proper installation. Harsh winters and ice dams significantly reduce flashing lifespan compared to milder climates.”
}
},
{
“@type”: “Question”,
“name”: “Can I repair chimney flashing myself?”,
“acceptedAnswer”: {
“@type”: “Answer”,
“text”: “Minor sealant repairs are possible for homeowners comfortable with basic tools and ladder safety. However, proper flashing installation requires roofing experience to ensure waterproof seals and code compliance. DIY repairs often fail prematurely when underlying installation issues remain unaddressed.”
}
},
{
“@type”: “Question”,
“name”: “What causes chimney flashing to leak?”,
“acceptedAnswer”: {
“@type”: “Answer”,
“text”: “Common causes include thermal expansion and contraction breaking sealant bonds, ice dams forcing water under flashing, rusted metal deterioration, improper original installation, and physical damage from storms or falling debris. Most leaks result from multiple failure factors rather than single causes.”
}
},
{
“@type”: “Question”,
“name”: “How much does chimney flashing repair cost?”,
“acceptedAnswer”: {
“@type”: “Answer”,
“text”: “Repair costs range from $300 for simple sealant replacement to $2,000-$5,000 for complete flashing system replacement on a standard chimney. Factors affecting cost include chimney size, roof pitch, accessibility, material choices, and whether underlying roof repairs are needed.”
}
},
{
“@type”: “Question”,
“name”: “Should I replace my roof when replacing flashing?”,
“acceptedAnswer”: {
“@type”: “Answer”,
“text”: “Flashing replacement often requires removing surrounding shingles, making it efficient to replace roofing materials during the same project if they are near end-of-life. If your shingles are less than 10 years old and in good condition, flashing replacement alone is usually sufficient.”
}
}
]
}
{
“@context”: “https://schema.org”,
“@type”: “HowTo”,
“name”: “How to Inspect Your Chimney Flashing”,
“step”: [
{
“@type”: “HowToStep”,
“position”: 1,
“name”: “Ground Level Visual Check”,
“text”: “Stand back from your home and use binoculars to examine flashing around the chimney. Look for rust stains, separated joints, missing sealant, or visible gaps between flashing and chimney or roof surfaces.”
},
{
“@type”: “HowToStep”,
“position”: 2,
“name”: “Interior Inspection”,
“text”: “Check ceilings and walls near the chimney for water stains, discoloration, or peeling paint. In the attic, look for moisture, mold, or daylight visible through roof areas around the chimney.”
},
{
“@type”: “HowToStep”,
“position”: 3,
“name”: “Seasonal Assessment”,
“text”: “Inspect flashing after winter ends and again after severe storms. Minneapolis weather creates year-round challenges, so seasonal checks help catch damage before leaks develop.”
},
{
“@type”: “HowToStep”,
“position”: 4,
“name”: “Professional Evaluation”,
“text”: “Schedule professional inspection if you notice any warning signs or cannot safely access roof areas. Professionals use moisture meters and infrared cameras to detect problems invisible to the naked eye.”
}
],
“image”: “https://keystoneroofingminneapolis.com/wp-content/uploads/2026/03/common-signs-your-roof-flashing-is-failing-around-1.png”
}
{
“@context”: “https://schema.org”,
“@type”: “BreadcrumbList”,
“itemListElement”: [
{
“@type”: “ListItem”,
“position”: 1,
“name”: “Home”,
“item”: “https://keystoneroofingminneapolis.com”
},
{
“@type”: “ListItem”,
“position”: 2,
“name”: “Blog”,
“item”: “https://keystoneroofingminneapolis.com/blog”
},
{
“@type”: “ListItem”,
“position”: 3,
“name”: “Common Signs Your Roof Flashing is Failing Around Your St. Anthony Park Chimney”
}
]
}
{
“@context”: “https://schema.org”,
“@type”: “Service”,
“serviceType”: “Roofing”,
“provider”: {
“@type”: “LocalBusiness”,
“name”: “Keystone Roofing Minneapolis”,
“url”: “https://keystoneroofingminneapolis.com”
},
“areaServed”: {
“@type”: “City”,
“name”: “Minneapolis”
},
“description”: “Learn to spot failing roof flashing around chimneys in St. Anthony Park. Our guide covers Minneapolis-specific signs, causes, and repair options for homeowners.”
}